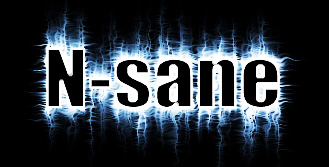
Shocking Text
Plug your text into a light socket!
- Rasterize Text
- Transform (Rotate)
- Wind Filter
- Hide Layer
- Contract


Guest Tutorial: Donated by Jim Beam
These tutorials are donated to N-sane Art by generous members of the Photoshop community. We at N-sane Art edit the text and images these tutorials for clarity only when necessary in order to preserve as much of the original tutorial as possible.
Create a new image 400x400px with a “transparent” background. Rename the only existing layer “back”.
Fill ( Edit > Fill ) layer "back" with black ( Hext #000000 ).
 Using the Horizontal Type Tool, write some large text in white ( Hex #FFFFFF ). For this tutorial, I wrote “N-sane” in 80 pt with the font Impact.
Rasterize the text ( Layer > Rasterize > Text ). Rename the layer that has the now rasterized text “Text”.
Duplicate layer “Text” and rename the new layer “Text 2”. Hide layer “Text 2” by clicking on the eye to the left of it on the Layer Palette.
Activate layer “Text” on the Layer Palette and merge all visible layers ( Layer > Merge Visible ).
Transform the image 90 degrees clockwise ( Edit > Transform > 90 degrees CW )
 Apply the Wind filter ( Filter > Stylize > Wind ) with the method “Wind” and the Direction “From the Right”. Repeat ( Ctrl-f ) this filter.
Now, apply the Wind filter ( Filter > Stylize > Wind ) again except this time, use the Direction “From the Left”. Repeat ( Ctrl-f ) this filter.
Transform the image 90 degrees counter-clockwise ( Edit > Transform > 90 degrees CCW ). We are now going to apply the Wind filter again except this time, only once in each direction.
 Apply the Wind filter ( Filter > Stylize > Wind ) with the method “Wind” and the Direction “From the Right”.
Now, apply the Wind filter ( Filter > Stylize > Wind ) again except this time, use the Direction “From the Left”.
 Apply the Ripple Filter ( Filter > Distort > Ripple ) to make the light wavy.
 Open the Hue/Saturation window ( Image > Adjustments > Hue/Saturation ) and press Ok with the default values.
 Unhide layer “Text 2” and activate it on the Layer Palette.
Select the text on the layer by pressing Ctrl then clicking on the thumbnail of the layer on the Layer Palette.
Contract ( Select > Contract ) the selection by 2 pixels. Now Fill ( Edit > Fill ) in the selection with black ( Hex #000000 ).
N-sane Staff Comment
This is the end of the original tutorial. We have added this following section for those of you who wish to add more contrast to the text.
First, merge all visible layers ( Layer > Merge Visible ).
Duplicate the only existing layer twice. You should now have three layers.
Change the Blending Mode of the middle layer to "screen".
Change the Blending Mode of the top layer to "overlay".
Your text should have much more contrast now!