Splattered Metal
This effect looks like someone spilt mercury all over the place!
- Levels
- Find Edges
- Radial Blur
- Chrome
- Colorize


 Create a new image 400x400px with a "transparent" background.
Render some Clouds ( Filter > Render > Clouds ). Next, render Difference Clouds ( Filter > Render > Difference Clouds ) four times. Do this by using the top menu to execute the Difference Clouds filter once, then pressing Ctrl-F 3 times to repeat the last filter (in this case Difference Clouds) three times.

 Bring up the Levels Menu ( Ctrl-L or Image > Adjustments > Levels... ). Use around the settings shown in the image to the right.
Apply a Gaussian Blur ( Filter > Blur > Gaussian Blur ) with a power of 6.

 Apply the Find Edges Filter ( Filter > Stylize > Find Edges ) then Invert ( Image > Adjustments > Invert or Ctrl-I ) your image.
Next, apply a Radial Blur ( Filter > Blur > Radial Blur ) with the settings shown to the above right. Repeat ( Ctrl-F ) the Radial Blur.
Bring up the Levels Menu ( Ctrl-L or Image > Adjustments > Levels... ). Use around the settings shown in the image below. You should have a pretty nice warp image right now.
Apply the Chrome Filter ( Filter > Sketch > Chrome ) with the Detail set to 0 and the Smoothness set to 10.


 To apply color to your splattered metal, Colorize the image using the Hue/Saturation window ( Image > Adjustments > Hue/Saturation ). Use the settings in the image to the right.
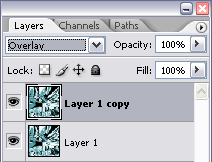
Lastly, we are going to increase the brilliance of the metal. Duplicate the layer and change the new layer's Blending Mode to "Overlay".