Oil Text
You will almost be able to smell the pungent odor of motor oil as you create this highly realistic oil text.
- Crop Tool
- Channels Tab
- Gaussian Blur
- Lighting Effects Filter
- Blending Modes


Create a new image with the demensions 500x100px with a transparent background and make a new layer.
Using the Text Tool write a word or two using the font Impact ( 72 pt. ) We used "N-sane ART" as our text. Make the color of the text 50% gray or #8A8A8A. Rename the layer "Oil Text"
![]() Use the Crop Tool to cut off the extra space around your word to get a result like the picture to the left.
Use the Crop Tool to cut off the extra space around your word to get a result like the picture to the left.
While pressing the Ctrl key, left click the "Oil Text" layer.
![]()
![]() Without deselecting, go to the Channels Tab and click on the little button on the bottom that says "Save selection as channel" when highlighted.
Without deselecting, go to the Channels Tab and click on the little button on the bottom that says "Save selection as channel" when highlighted.
 Your channels tab should have a new channel called "Alpha 1." Select channel "Alpha 1"
You should still have your text selected from step 3. Do the following
Gaussian Blur ( Filter > Blur > Gaussian Blur ) Radius: 5 pixels
Gaussian Blur ( Filter > Blur > Gaussian Blur ) Radius: 2.5 pixels
Gaussian Blur ( Filter > Blur > Gaussian Blur ) Radius: 1 pixels
Deselect the text.
Go back to your Layers Palette and select the "Oil Text" Layer.
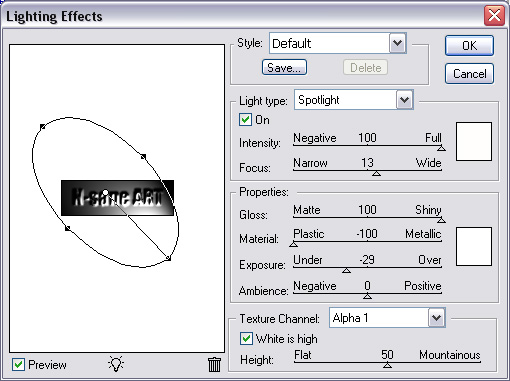 Use the Lighting Effects Filter ( Filter > Render > Lighting Effects ) and click "Ok" to rasterize the layer.
Use the settings in the picture and set the light up exactly like the image.
 Create a new light by dragging the light bulb into the preview.
Select the new light and set it up exactly like the image ( the upper color’s blue color is #00A2FF )
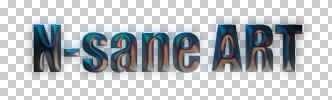
![]() If you have an image like the one to the left, congratulations! You have come a long way! You just passed the hard part so the rest is easy. You could stop right now and have metal text but you came to get Oil Text so don’t give up now!
If you have an image like the one to the left, congratulations! You have come a long way! You just passed the hard part so the rest is easy. You could stop right now and have metal text but you came to get Oil Text so don’t give up now!
Right click the "Oil Text" layer in the layer palette and "Duplicate Layer"
 Change "Oil Text Copy" layer's blending mode to Difference.
Select the "Oil Text Copy" layer and use the Gaussian Filter ( Filter > Blur > Gaussian Blur ) with a Radius of 5 pt.
Now that you are finished with the text, it is time to add a nice background. Suprisingly, a flat black works very well with the Oil Text. For our Oil Text, we added a flat back background with a slight diagonal pattern.