
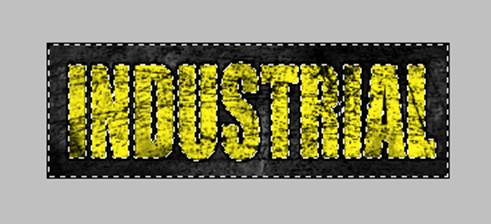
Industrial Text
Learn how to create a grunge texture while creating this industrial text!
- Brush Tool
- Polygon Lasso Tool
- Select Inverse
- Bevel and Emboss


Guest Tutorial: Donated by GlowBug
These tutorials are donated to N-sane Art by generous members of the Photoshop community. We at N-sane Art edit the text and images these tutorials for clarity only when necessary in order to preserve as much of the original tutorial as possible.
Write some text using the Horizontal Type Tool that you want to look scrached and worn out (Impact is a good font to use, if you can't find any other). Use a bright color (I used yellow).

Rasterize the text ( Layer > Rasterize > Text ). If you want your text to be more bold, Free Transform ( Edit > Free Transform ) and strech your text out horizontally a bit.
Now create a new layer above your text layer. This will be where we have our scratches and stuff.
Now it would be nice to have a brush set to create the worn-out scratch effect. I used one called Lizzy_scratch (you can search Google for this) Now brush some scratches over your text until it looks nice.
N-sane Staff Comment:
If you wish to create the grunge texture yourself, please look at the next step.
Skip this step if you have already made your grunge.
For those of you who do not know how or do not want to use custom brushes, we have an alternative for you:
 Take out your Brush Tool. In the settings bar, load the “Natural Brushes 2” set of brushes.
 Choose the brush on the very bottom (shown in the image to the right) and change the “Master Diameter” to a bit larger than how tall your text is. I chose 130px because it looked right.
Make sure your Foreground Color is black ( Hex #000000 ). Take your brush and just dab over your text. Don’t cover the text completely. You want shades of gray.


Skip this step if you have already made your grunge.
Take your Polygon Lasso Tool and semi-carefully make a zig zagging selection from side to side going down. Basically create a “Z” except with more than 2 zig zags. Take your “Move Tool” and move the selection down a few pixels.


Strictly horizontal lines are bad so let’s add some variety. I decided to make a few vertical selections. Move these to the left or right a few pixels.


There you go. You now have a simple grungy texture.
Now thay you've finished that, activate your text layer on the Layer Palette and use the Magic Wand Tool to select your text like so:
Another way to select the text is to click the thumbnail of the text layer in the Layer Palette while pressing Ctrl. Then Invert the Selection ( Select > Inverse ).

See? Same result, different technique.
Activate your scratch layer on the Layer Palette and hit delete so we don't get any scratches outside our text.

 Merge the two layers (text and scratches) together. Give the text a 2px black stroke ( Edit > Stroke ) on the outside.
Merging two layers is an easy procedure. Look for your version of Photoshop below to find the correct steps.
 Photoshop 6, 7: The scratches layer should be activated on the Layer Palette. Click the link area for the text layer on the layer palette (shown in the image to the right). Then Merge Linked ( Layer > Merge Linked ).
Photoshop CS+: Activate both layers on the Layer Palette just like you would select two folders on a PC or Mac. Then Merge Layers ( Layer > Merge Layers )
Now go to open the Blending Options for the now single text/grunge layer and add the following setting:
 Inner Bevel
Chisel Hard
Depht: 400%
Size: 1px
Soften: 0px

Make your background a dark shade of gray and add some brushing scratches in the same way you did to the text. If you have a metal plate brush use it as well, it will look good!
You can also use the Dodge and Burn tools to make bumps and some lighting effects!

