Interface Screws
A simple dirty screw for use in your interfaces.
- Elliptical Marquee Tool
- Zoom
- Pencil Tool
- Burn Tool
Note: You need a flat surface or relatively flat surface on your interface to do this tutorial. For the purposes of this tutorial, my "interface" will be a flat layer filled with the color Hex #333333. I recommend you also try this tutorial on a background of #333333 before doing it on your real interface.
Open your Interface and find a nice place to add this detail to. In the case of screws, It is good to put it on the edge of a metal plate or a flat surface. My "interface" is a flat layer of color Hex #333333. From now on, I will call the already existing interface (or in my case my background) the "background".
Create a new layer and name it "head". Choose the Elliptical Marquee Tool. Look for it's options on the top of the Photoshop window. There should be "Style:" with a dropdown. From the dropdown, select Fixed Size. For the "Width" put 14px and for the "Height" put 14px.
Tip: Your screw can be any size you want. We find that any bigger than 14px in diameter makes the screw look silly.
Make a selection using the Elliptical Marquee Tool on the background.
 Reset the Color Palette ( Press D ). Choose the Gradient Tool and make sure it is set to Linear Gradient from black to white. Also make sure Reverse is not checked.
Now, Zoom In ( View > Zoom In ) to about 700% and make a gradient by dragging from around the "X" on the image to the left to the end of the line.

 Set the opacity of layer "head" to 30%. Make a new layer above layer "head" and name it "black". Using the Pencil Tool set to 1px, make a black shape like the image to the left.
Create a new layer called "white" and set its opacity to 38%. Create a white shape on it like the image to the right and above using the Pencil Tool.
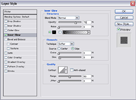
 Change the opacity of layer "head" to 100% and open its Blending Options. Add an Inner Glow using the settings in the image to the right.
![]() You should now have something like the image to the left. It still looks flat so we need to take out the Burn Tool. It is right under the gradient/paintbucket tool. It looks like a hand. The Burn Tool "darkens" the things it touches. Change the settings of the Burn Tool to:
You should now have something like the image to the left. It still looks flat so we need to take out the Burn Tool. It is right under the gradient/paintbucket tool. It looks like a hand. The Burn Tool "darkens" the things it touches. Change the settings of the Burn Tool to:
 Brush: 1px
Range: Highlights
Exposure: 100%
Airbrush: Not selected
What you are going to do is "burn" 1 pixel around the cross of the screw to make it 1 shade darker. See the sample for a guide.
Note: It will sometimes take only one stroke of the burn tool to make a difference and sometimes it will take multiple strokes.
As you can see, 1 pixel around the cross is darker.
Now you are going to burn the outside of the screw, Change the settings of the Burn Tool to:
 Brush: 1px
Range: Midtones
Exposure: 50%
Airbrush: Not selected
Activate the background layer on the Layer Palette and burn the outer circumference of the screw. It may take from 3-20 strokes of the Burn Tool around the screw to make it dark enough.


