
Interface Metal Plates
Learn to draw stylish realistic metal plates that will enhance any layout!
- Fill
- Zoom
- Burn Tool
- Dodge Tool


Note: You need a flat surface or relatively flat surface on your interface to do this tutorial. For the purposes of this tutorial, my "interface" will be a flat layer filled with the color Hex #333333. I recommend you also try this tutorial on a background of #333333 before doing it on your real interface.
Open your Interface and find a nice place to add this detail to. Metal plates work well as structures and fillers behind other objects. My "interface" is a flat layer of color Hex #333333. From now on, I will call the already existing interface (or in my case my background) the "background".
 First make a selection of what you want the plate to look like. I would recommend using the Rectangular Marquee Tool or the Polygon Lasso Tool.
I will be making a trapezoid shaped plate. Make a new layer. Fill ( Edit > Fill ) the selection you made with the color Hex #1A1A1A.
Now its time to use the Dodge Tool! The Dodge Tool "lightens" areas where it is used. This tool is right below the gradient/paintbucket tool. It may be hidden behind the Burn Tool. Select the Dodge Tool and set its settings to:
 Brush: 1px
Range: Midtones
Exposure: 100%
Airbrush: Not selected
You may want to Zoom In ( View > Zoom In ) at this point (700% or more). What you are going to do is use the Dodge Tool on the corners of your plate.
 Do this by going to each corner and going over it with the Dodge Tool a couple times. Do this to every corner. See the example above.
You should have something like the example to the right.
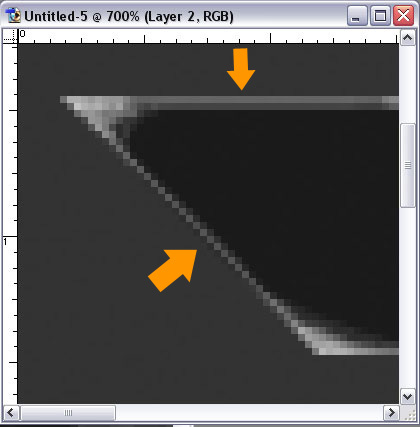 Now you are going to lighten the edges of the plate. Go to every edge and lighten about 1-2 pixel of it. At this point, you may want to lighten the corners further to help them stand out. Refer to the example to the left.
It is time to use the Burn Tool. It is also right under the gradient/paintbucket tool. It looks like a hand. The Burn Tool "darkens" the areas it is used on. Change the settings of the Burn Tool to:
 Brush: 3px
Range: Midtones
Exposure: 25%
Airbrush: Not selected
You are going to darken the plate INSIDE the white edge. Do this lightly like the reference image above. The circle in the reference image is my Burn Tool.

 Now to add some more details. Reselect the Dodge Tool add little "nicks" to the white edge and to the middle of the plate. Look at the reference image to the left.
Now you are done with the plate it self! But hmm it still looks flat. Time to add some depth!
Take out the Burn Tool and set the exposure to 100% and brush to 5px. Duplicate the plate layer twice. Move the top plate layer up 20 pixels and the second plate 10 pixels up.
 In order add depth, we have to add shadows. For these plates, we are going to pretend that the light source is directly above.
Activate the second plate layer and darken the plate where the shadow would be from the top plate. Do this for the bottom plate as well.
 The plates still look flat on the layout. In order to fix this, Activate the background layer on the Layer Palette and darken it where the plates would cast a shadow. You may want to change the Exposure of the Burn Tool to 50%.
You are now done! Be creative and try all different shapes!
