
Crystal Clear Iris
Quickly create a very realistic and detailed iris for an eyeball.
- Elliptical Marquee Tool
- Rectangular Marquee Tool
- Wind
- Polar Coordinates
- Rotate Canvas


Create a new image 100x100px with a transparent background
Choose two colors for your eyes. They will most likely be the same hue, the only difference being the lightness. Make your Foreground Color your darker one and your Background Color your lighter. For this tutorial, I will use color Hex #FFB40 for my lighter color and color Hex #865F00 as my darker.
Fill ( Edit > Fill ) the background layer with white ( Hex #FFFFFF ).
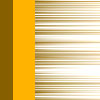
 Using the Rectangular Marquee Tool, make a rectangular selection and Fill ( Edit > Fill ) it in with your darker color. Refer to the image to the left.
Invert the colors ( Image > Adjustments > Invert or press Ctrl-I ).
Apply the Wind filter ( Filter > Stylize > Wind ) with the following settings:
Method: Wind
Direction: From the Left
Repeat this filter three times. Do this by pressing Ctrl-F three times.
Invert the colors ( Image > Adjustments > Invert or press Ctrl-I ).
 Make a new layer. Activate the new layer on the Layer Palette and make a new selection slightly to the right of where you last selected. Fill ( Edit > Fill ) it in with your lighter color. Refer to the image to the left.
Apply a Gaussian Blur ( Filter > Blur > Gaussian Blur ) with a strength of 4.5.
Merge all visible layers ( Layer > Merge Visible ).
Invert the colors ( Image > Adjustments > Invert or press Ctrl-I ).
Apply the Wind filter ( Filter > Stylize > Wind ) with the following settings:
Method: Wind
Direction: From the Left
Once again, Invert the colors ( Image > Adjustments > Invert or press Ctrl-I ).
 Apply a Motion Blur ( Blur > Motion Blur ) with the following settings:
Strength: 30
Angle: 0
Rotate the canvas 90 degrees counter-clockwise ( Image > Rotate Canvas > 90 degrees CCW ).
Copy the whole image by Selecting All ( Select > All ) and copying.
Leave this image alone for now.
Create a new image 200x200px with a transparent background.
 Paste two of your previously copied images. Arrange them like the image to the left and merge all visible layers ( Layer > Merge Visible ).
 Create a new layer and move it, on the Layer Palette, below the layer with the pasted images. Activate the new layer on the Layer Palette.
Fill ( Edit > Fill ) the upper half of the new layer black ( Hex #000000 ) and the lower half white ( Hex #FFFFFF ).
 Activate the layer with the pasted images on the Layer Palette. Make a selection like the image to the left.
TIP: It is easy to make more than one selection.
1. Make your first selection.
2. While pressing shift, make your next selection.
3. Repeat step two as many times as you need.
 Apply a Gaussian Blur ( Filter > Blur > Gaussian Blur ) to the selection with a strength of 2. Merge all visible layers ( Layer > Merge Visible ).
 Use the Polar Coordinates Filter ( Filter -> Distort -> Polar Coordinates ) and choose Rectangular to Polar.
Your iris is complete!
 Using the Elliptical Marquee Tool, create a perfectly circular selection following the reference image to the left.
TIP: To create a perfectly circular selection, press shift while making the selection.
 Using the Rectangular Marquee Tool, deselect half of the circular selection.
TIP: To deselect portions of existing selections, take any selection tool and press alt while starting a new selection. The area this new selection encompasses will be removed from the existing selection.
 Reset the Color Palette ( Press D ). Make a new layer and activate it on the Layer Palette. With the Gradient Tool set to linear from black to white, make a gradient in the selection. The white end of the gradient should be at the top of the selection.
 Change the Blending Mode of the new layer to screen.
You are done! Don't stop here though. Try different color combinations out and such. Also, now that you have seen one interesting way the Polar Coordinates filter works, experiment with it! You will quickly see how interesting the results it produces can be!
