
Planetary Collapse
Use masks and blurs in conjunction with the Extrude Filter to create the illusion of a planetary collapse.
- Clouds
- Difference Clouds
- Levels
- Extrude
- Radial Blur
- Layer Mask


Create a new image 500x500px with a "transparent" background. Press D to reset the Color Palette. Rename the existing layer "color land"
 Render some Clouds ( Filter > Render > Clouds ). Next, render Difference Clouds ( Filter > Render > Difference Clouds ) four times. Do this by using the top menu to execute the Difference Clouds filter once, then pressing Ctrl-F 3 times to repeat the last filter (in this case Difference Clouds) three times.
 Bring up the Levels Menu ( Ctrl-L or Image > Adjustments > Levels... ). Use around the settings shown in the image to the left.
![]() Extrude ( Filter > Stylize > Extrude ) the layer with the settings shown to the left.
Extrude ( Filter > Stylize > Extrude ) the layer with the settings shown to the left.
Invert ( Ctrl-I or Image > Adjustments > Invert ) the colors of the image.
 Duplicate layer "color land" by right clicking the layer in the Layer Palette and clicking "Duplicate Layer". Rename the new layer "blast land".
Select layer "blast land" on the Layer Palette and give it a Radial Blur ( Filter > Blur > Radial Blur ) with the settings shown in the image.
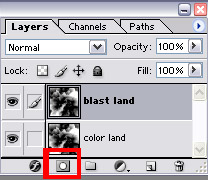 Add a Layer Mask to layer "blast land" by clicking on the "add layer mask" button on the bottom of the Layer Palette.
Click on the Gradient tool and choose the "Radial Gradient". Check "Reverse". Click the middle of the image and drag out to the corner of the image to make a nice black to white circle gradient in your layer mask.
![]()
 Choose layer "color land" on the layer palette, open the Hue/Saturation menu ( Image > Adjustments > Hue/Saturation ) and use the following settings to the left.
Duplicate layer "color land" and change the Blending Mode of the new layer to "Overlay".

