Ice Wall

Create this seemingly frozen wall in four easy steps.


Steps:
4 Steps
Difficulty:
Very Easy
Important Tools:
  • Clouds
  • Difference Clouds
  • Glass Filter
  • Hue/Saturation
  • Blending Modes

Step 1 - Creating the Base
Hide Step

Create a new image 500x500px with a "transparent" background.

Render some Clouds ( Filter > Render > Clouds ). Next, render Difference Clouds ( Filter > Render > Difference Clouds ) four times. Do this by using the top menu to execute the Difference Clouds filter once, then pressing Ctrl-F 3 times to repeat the last filter (in this case Difference Clouds) three times.


Step 2 - Applying the Glass Filter
Hide Step

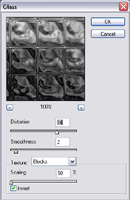
Distort the clouds with the Glass Filter ( Filter > Distort > Glass ) using the settings in the image below.

Glass Filter Settings Glass Filter Result


Step 3 - Coloring the Ice Wall
Hide Step

ColorizeColorize the image using the Hue/Saturation window ( Image > Adjustments > Hue/Saturation ). Use the settings on the Left.

Duplicate the layer you just colored and change the new layer's Blending Mode to "Overlay".


Step 4 - Optional Glow
Hide Step

Finished Ice WallIf you wish to make your Ice Wall more glowy, you can do the following:

Duplicate the top layer and change the new layer's Blending Mode to "screen".

Apply a Gaussian Blur ( Filter > Blur > Gaussian Blur ) the upper layer with a power of 2-5.


Bottom Bar